In this tutorial I will teach you how to make a seemingly boring photo into something quite spectacular. We will change the mood of the photo from a muggy day to a stormy day by applying a few colour overlays, combined with some magic photoshop filters. This may sound complex, but read on and see how you can be cool like me.
The first step is to source a landscape photo that you think looks boring, yet has the potential to look a little more interesting.

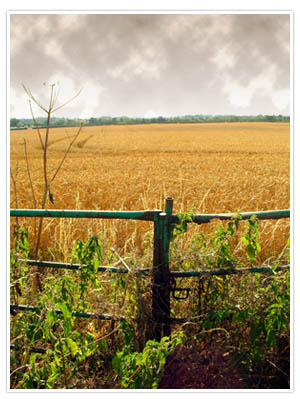
I chose this photo I took in the open fields of the Cotswolds, UK. Its lacking colour, and depth, but watch how we can fix that.
The first step is pretty straight forward, and something I usually start with. Auto Levels. This can be found by navigating from the “Image” menu, to “Adjustments”, to “Auto Levels”.

Photoshop does a colour correction according to what it thinks works best. Often Photoshop makes a boo boo and makes a photo look worse than it was originally. In that case just don’t use it.
With my photo, it increases the contrast in colours, but adds a little too much red. To fix that I use the “Colour balance” tool. Found in the same menu as “Auto Levels”, or alternatively can be found using the shortcut key, CTRL + B, or with a MAC I presume it is, APPLE key + B. Shortcuts are a designer’s best friend.

With a few alterations to the colour balance of the shadows, midtones and highlights we can dramatically alter the photo. Nifty hey?
The next step is to add some depth to the sky, all I do here is create a new layer, chose a grayish colour, and use the gradient tool to create a gradient from gray to transparent over the sky area. This can be seen below:

I then change the layer colour mode to “Linear Burn”. And it does its magic.
In the same way I could make a blue sky, a beautiful summer’s day. Just select the gradient layer you have just made, navigate to the Hue/Saturation menu (located in the same place as “Auto Levels” and “Colour Balance”), and make some small changes. You could copy the properties listed below, if you can read them of course!

Right, let’s create the cloudy, stormy effect now. Create a new layer, and make sure your foreground and background colours are set to the photoshop default of black and white. Then navigate to “Filter” – “Render” – and then “Clouds”. You’ll see your screen is filled with a black and white cloudy effect. Move the layer so that only the sky area is covered with the clouds and, using the eraser tool, rub out a rough edge at the bottom of the clouds layer, like below:

The last step is to change the layer colour mode to “Vivid light”, drop its opacity to “65“, and its fill to “44“.
There you have it. Voila!
12 responses
Nice Mark! If you’re ever looking for ideas on photoshop tutorials, I’d personally like to see one on how to create a “torn-edged” paper that looks realistic.
nice – very nice – Now I’m off to go play with my own pictures.
as long as it’s just your pictures you’re playing with 🙂
Mr, you are so very talented….you should consider doing this as lessons for colleges like mine.
great post. man i love this stuff.
haha rasta rebel…can’t say that I did or did not
im stuck at the 2 part when u creat the blue sky idk how to do it can u help me plz
the stormy weather is okay.. but overall it looks fake.. becoz of the bright open field and the leaves… stormy weather = dark cloudy.. therefore less light…
This is worth it just for the ‘linear burn transparent layer’ part!
[…] I designed this wallpaper in Photoshop. I used the “Clouds” effect (that I spoke about in my tutorial a couple weeks back), combined with some great plantlife brushes, and some lighting effects. […]
[…] After posting the photoshop tutorial I created for my blog, I thought I might submit it to a few tutorial search engines. I’ve been registered to probably the largest tutorial search engine, Pixel2life, for some time now, and have submitted a couple tutorials in the past. For our main company site though. […]
You need some perspective to the clouds
otherwise it looks like smoking
in the distance blowing by.